
HP Color LaserJet M652 Paper Jam Fix: Fuser Replacement
A faulty fuser unit can cause frequent paper jams, poor print quality, and error messages that disrupt workflow. By following this guide to replace the fuser in your HP M652 series printer, you can restore smooth printing operations and extend the life of your device.
The following tutorial is for these models:
Color LaserJet Managed E65050dn
Color LaserJet Managed E65060dn
Color LaserJet Managed E65150dn
Color LaserJet Managed E65160dn
Color LaserJet Managed Flow MFP E67560z
Color LaserJet Managed Flow MFP E67660z
Color LaserJet Enterprise Flow MFP M681f
Color LaserJet Enterprise Flow MFP M681z
Color LaserJet Enterprise Flow MFP M682z
Color LaserJet Enterprise M652dn
Color LaserJet Enterprise M652n
Color LaserJet Enterprise M653dh
Color LaserJet Enterprise M653dn
Color LaserJet Enterprise M653x
Color LaserJet Managed MFP E67550dh
Color LaserJet Managed MFP E67650dh
Color LaserJet Enterprise MFP M681dh
Color LaserJet Enterprise MFP M681f
When Do You Need to Replace the Fuser Unit?
If you're getting error messages, this may indicate it's time to replace the fuser unit. Listed here are all the errors that indicate a problem:
13.B9.XX Jam in Fuser
13.B2.XX Jam in
13.FF.XX Door Open Jam
Step-by-Step Guide: Replacing the Fuser Unit
Prior to starting, it is imperative to remember power off the device and disconnect from its power source at the back.
This step-by-step tutorial will further break down the steps to remove and replace the fuser unit for the HP M652. Let’s begin!
Step One: Power Off Printer
Power off the printer and unplug the power cord from the outlet.
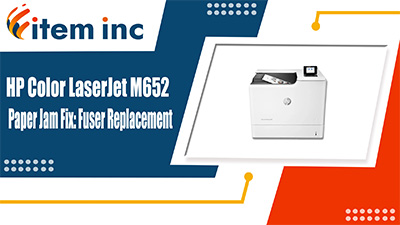
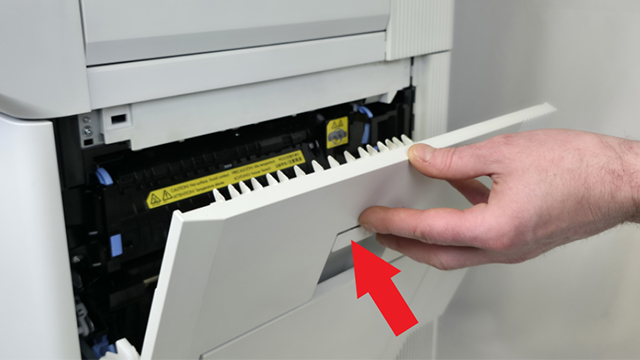
Step Two: Open Right Door
Start by opening the right door assembly.
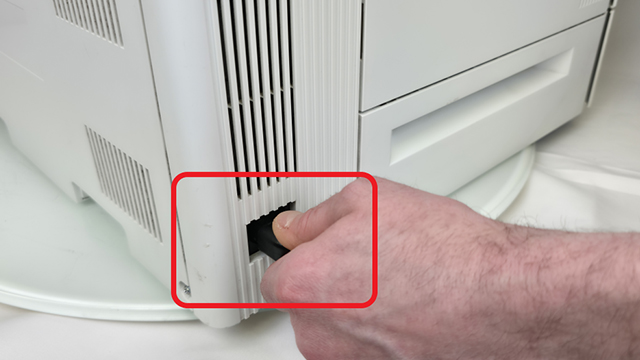
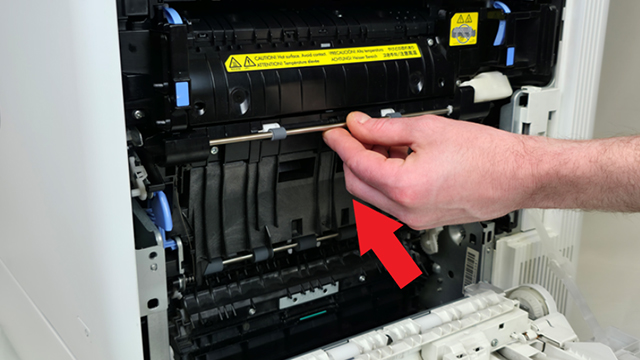
Step Three: Lower Secondary Transfer Assembly
Lower the secondary transfer assembly to gain access to the fuser for removal.
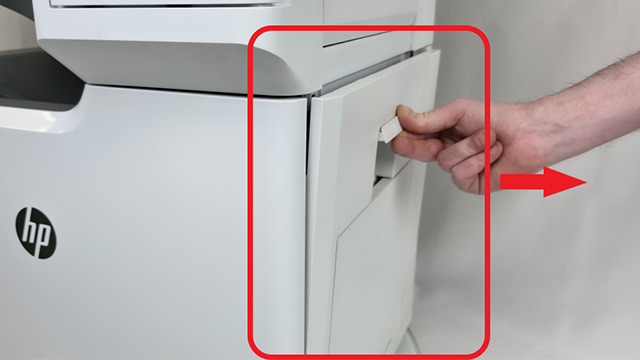
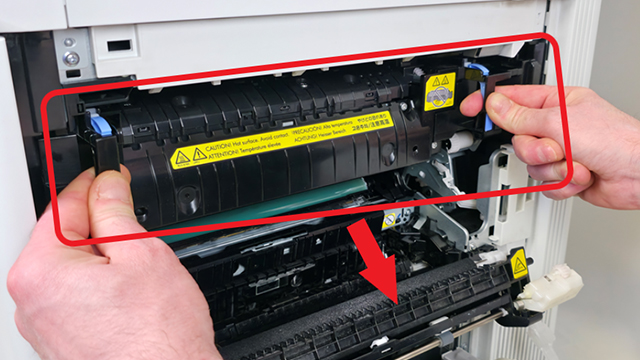
Step Four: Remove Old Fuser
Firmly grip the handles and pull the old fuser away from the printer to remove it.
Step Five: Install New Fuser
Hold the handles and position the fuser inside the printer. Push the fuser firmly toward the printer to secure it in place.

Step Six: Close Secondary Transfer Assembly
Close the secondary transfer assembly to secure it back in place.
Step Seven: Close Right Door
Firmly close the right door assembly to ensure it is properly secured.
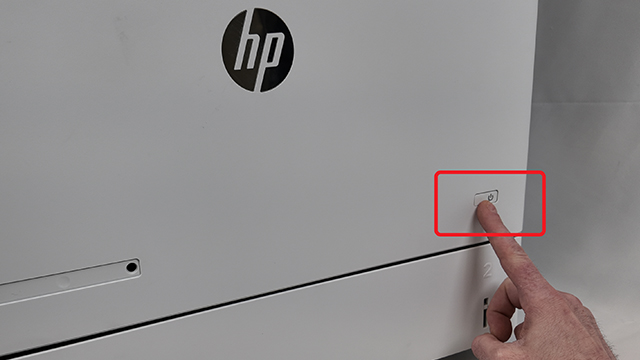
Step Eight: Power Printer On
Plug the power cable securely into the printer and a power outlet. Then, switch on the printer using the power button on the device.
The Benefits of Replacing Your Printer's Fuser Unit
Replacing the defective fuser with a new fuser assembly (MPN: P1B91A, RM2-1928) keeps your printer running efficiently, producing clean, smudge-free prints. This is essential for businesses and users who rely on their HP M652, M681, E65050, and E67550 series printers for uninterrupted performance.
Order Your Replacement Parts Today!
Order the replacement parts needed for this step-by-step tutorial right here:
P1B91-69001, P1B91A, RM2-1928, RM2-1928-000, RM2-1928-000CN, RM2-1928-020, RM2-1928-020CN, RM2-1928-030, RM2-1928-030CN - HP M652 Fuser Unit, 110V
Follow Us on YouTube for More Tutorials
Thank you for completing this step-by-step tutorial! We hope you found it useful. Stay connected with us by following our YouTube channel and subscribing for more valuable content. We would love to hear from you, so please leave a comment.
Click here to view Item, Inc. YouTube channel.
Need More Help?
If you need more assistance with sales, repairs, or identifying a part, contact us by phone, chat, or email. Our team is ready to help you find the best solution!